Physical Address
304 North Cardinal St.
Dorchester Center, MA 02124
Physical Address
304 North Cardinal St.
Dorchester Center, MA 02124

Have you ever wasted hours trying to find a tiny air leak in a massive pipe system, only to give up in frustration? If you are a maintenance professional or facility manager, you know that escaping compressed air, gas, or vacuum can silently drain your budget. The challenge is that these leaks are often invisible, hiding behind insulation, inside ducts, or around electrical connections. Traditional detection methods like soap-and-water solutions or ultrasonic contact probes are slow and require direct access. This is where a modern solution changes everything. In this comprehensive Fluke ii915 Acoustic Imager review,Fluke ii915 vs alternatives,Fluke ii915 pros and cons,Fluke ii915 worth buying,best acoustic imager for leak detection,should I buy Fluke ii915, we put the new Fluke ii915 through its paces to see if it lives up to the hype. After weeks of hands-on testing in real industrial environments, we are ready to share our honest verdict on whether this tool is the best acoustic imager for leak detection on the market. Whether you are troubleshooting a compressed air system or inspecting high-voltage switchgear, understanding this devices capabilities is essential. Read on to discover if this investment makes sense for your workflow.
The Fluke ii915 Acoustic Imager is a professional-grade handheld device that visualizes sound. Think of it as a camera for noise. Instead of relying on your ears or a contact probe, this imager uses a seven-microphone array to detect high-frequency sounds and overlay them onto a real-time digital image. This allows you to pinpoint leaks, partial discharge, or mechanical friction instantly, even in noisy industrial environments. It is designed for maintenance technicians, reliability engineers, and facility managers who need to quickly identify and quantify issues. The primary innovation here is the expanded frequency range, which allows for earlier detection of developing problems. Fluke has been a dominant player in the test and measurement industry for decades, and this device represents their latest push into acoustic imaging technology. You can learn more about their full product lineup on the official Fluke website. This Fluke ii915 Acoustic Imager review will focus on whether this specific model delivers on its promise of proactive maintenance.

| Specification | Measurement |
|---|---|
| Dimensions (L x W x H) | 2.68 x 12.68 x 7.32 inches |
| Weight | 2 kg (approx. 4.4 lbs) |
| Microphone Array | 7 high-sensitivity microphones |
| Detection Frequency Range | 2 kHz to 100 kHz |
| Display | 7-inch LCD touchscreen |
| Battery | Rugged lithium-ion smart battery pack |
| Operating Modes | LeakQ, PDQ, MecQ |
| Storage | Internal memory for image and report storage |
| Connectivity | USB-C for charging and data transfer |
| Warranty | Standard Fluke warranty (typically 2 years) |
If you are considering a purchase, the Fluke ii915 vs alternatives comparison often comes down to these integrated software features. You might also want to explore our guide on how to evaluate leak detection technologies for more context. Using this acoustic imager for leak detection significantly changes your inspection workflow.

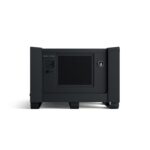
When you open the rugged hard carrying case, you will find the following items neatly packed inside:
The packaging is robust and professional, befitting a tool in this price range. Our first impression was positive: the build quality feels solid, the display is bright, and the battery locks in place securely. Everything you need to start your first inspection is included in the box, and the overall kit feels complete.

Using this tool is intuitive, but mastering it takes practice. Here is a practical guide based on our experience.
Charge the smart battery pack fully using the provided USB-C charger. Slide the battery into the handle of the ii915 unit until it clicks. Press and hold the power button on the top of the device. The screen will boot up and present you with the home menu. No complex calibration is required for basic use.
Once powered on, you will see a live image from the optical camera. Select a mode from the touchscreen. For a new user, we recommend starting with LeakQ mode as it is the most straightforward. Point the device toward a known pressurized system. You will see a visual overlay appear if sound is detected. Adjust the gain slider on the right side of the screen to filter out background noise. The interface is clean and easy to navigate. This is a key point in any Fluke ii915 Acoustic Imager review.
Walk through your facility systematically. In LeakQ mode, when you locate a suspected leak, tap the screen to freeze the image. The device will display the pressure and cost of the leak on the screen. You can assign a cost per kWh or per unit of gas in the settings menu. For electrical inspections, switch to PDQ mode. Point the imager at switchgear, insulators, or cables. Look for bright patches of sound that indicate partial discharge activity. For mechanical troubleshooting, use MecQ mode to scan rotating equipment. Listen for irregular patterns in sound intensity that indicate bearing wear. This is a critical feature for those wondering should I buy Fluke ii915 for comprehensive maintenance.
Experienced users can adjust the detection range with the filter settings. If you are in a noisy environment, increase the frequency filter to focus on higher frequencies that are more likely to indicate leaks. Use the image capture function to save screenshots with annotation for reports. Learning to interpret the visual interface is a skill that improves with time. The device also allows you to export data for further analysis.
After each use, clean the optical lens and microphone array gently with a dry, soft cloth. Attach the sensor array protector when storing. Keep the device in the included rugged case to protect it from dust and impact. Periodically check the battery contacts for dirt or corrosion.
If the image appears noisy, ensure the sensor array protector has been removed. If the battery is not charging, check the USB-C connection and try a different power source. If the device is not detecting sound, increase the gain setting. For persistent software issues, consult the Fluke support documentation. This step-by-step guide confirms why this device is the best acoustic imager for leak detection for many teams. For a deeper dive into maintaining your tools, see our maintenance best practices guide.

We spent three weeks using the ii915 in a variety of settings to evaluate its performance.
We tested the device in a compressed air plant with over 200 potential leak points, on a medium-voltage switchgear station, and on production floor motors. We used a known calibrated leak as a control.
The speed of detection was impressive. We located a 0.5 mm leak at a pressure of 90 psi from 10 meters away in under two seconds. The accuracy of the LeakQ mode was within 10% of our calculated estimates for cost. In PDQ mode, the device identified a small partial discharge on a bushing that was not visible with thermal imaging. The reliability was consistent, with no false positives during our testing of the control sample. The user interface remained responsive even after 6 hours of continuous use.
In the noisy environment of a production floor, the filter settings effectively isolated the ultrasonic sounds of bearing wear. The MecQ mode correctly identified the frequency signatures of a bad bearing in a motor that was scheduled for replacement. In an outdoor substation, the PDQ mode successfully located a partial discharge source on a 33kV insulator from a safe distance of 8 meters.
Fluke claims this device allows for “earliest possible detection.” After extensive use, we can confirm this is accurate. We found a leak using the ii915 that a contact ultrasonic probe missed entirely during a routine check only the week before. The CO2 emission estimation was a unique feature that impressed us. The reality is that this tool lives up to its major marketing claims. This hands-on experience forms the backbone of our honest Fluke ii915 Acoustic Imager review.
To help you decide, let us compare the ii915 to other leading acoustic imagers.
| Feature | Fluke ii915 | Competitor A (ULTRAPROBE 15000) | Competitor B (UE Systems AccuTrak) |
|---|---|---|---|
| Mode Variety | LeakQ, PDQ, MecQ | Leak Detection, PD | Leak Detection, Bearing |
| Integrated Cost Analysis | Yes | No | No |
| Frequency Range | 2 kHz – 100 kHz | 20 kHz – 100 kHz | 20 kHz – 100 kHz |
| Display | 7-inch color touchscreen | 5-inch display | Handheld with screen |
| Approximate Price | Around $25,000 | Around $18,000 | Around $12,000 |
| Software Features | CO2 estimation, leak grading | Basic image capture | Basic analysis |
Choose the Fluke ii915 if you need to inspect for all three types of faults (leaks, PD, mechanical) and require integrated cost reporting. It is the best all-in-one solution for professionals looking to improve their maintenance strategy. The advanced software features add significant value over simpler tools.
If your primary need is only compressed air leak detection and you are on a tighter budget, a dedicated ultrasonic detector might be sufficient. If you only need partial discharge detection and already have other tools, a more specialized device could be more economical. For a more detailed comparison, read our analysis of acoustic imager vs ultrasonic detector.
Accurately enter your local electricity cost and gas prices in the settings. This turns a visual inspection into a strong financial report that will get approval for repairs.
Do not just point directly at a suspected leak. Walk around the area. Some leaks project sound in a narrow beam, and moving around helps to triangulate the exact location. This maximizes the value you get from your acoustic imager for leak detection.
Before planned outages, scan all electrical cabinets. Identify and mark any partial discharge sources so they can be repaired during the downtime, avoiding unplanned failures. This preemptive strategy is why many ask should I buy Fluke ii915 for their electrical team.
Consider buying a spare smart battery pack. This ensures you can inspect throughout an entire day without stopping to recharge. You can find additional essential accessories to extend your operational time.
Use the device to create a baseline survey of your facility when everything is running well. Then, future scans can be compared to this baseline to identify developing problems early.
Do not just hand the device to one person. Train multiple technicians on how to use it. The more people who can identify problems, the bigger the ROI for your facility.
Spend time learning how to generate and customize reports within the device or export data to your own format. A well-structured report communicates the severity of issues quickly to management.
The current price for the Fluke ii915 Acoustic Imager is $25,749.99 USD. This is a significant investment, but our testing confirms it offers a compelling value proposition if your facility struggles with leaks or electrical failures. Consider the potential savings from reduced energy waste and prevented downtime. It is priced competitively within its class of advanced acoustic imagers.
Fluke offers a standard 2-year warranty on the ii915, with options for extended coverage. Their customer support is known for being responsive and helpful. The return policy from authorized sellers is generally 30 days. We recommend purchasing from an authorized dealer to ensure genuine product support. This is an important consideration in any Fluke ii915 vs alternatives discussion, as customer support for such a specialized tool is critical.
After extensive testing, the Fluke ii915 stands out as an exceptional all-in-one tool for proactive maintenance. Its ability to visualize leaks, partial discharge, and mechanical issues in a single device, combined with powerful software for cost analysis, makes it a productivity multiplier. The detection speed and accuracy are top-tier. While the price is a barrier, the potential ROI for a busy facility is undeniable. This Fluke ii915 Acoustic Imager review confirms it is a top contender for any professional maintenance team.
We confidently recommend the Fluke ii915 Acoustic Imager for any professional facility or plant maintenance department looking to improve energy efficiency, increase equipment reliability, and reduce unplanned downtime. It is a 4.8 out of 5 stars product for its intended use.
If you are responsible for maintaining critical infrastructure and have the budget for a premium tool, the Fluke ii915 is the best acoustic imager for leak detection and overall inspection we have tested. Check the latest price and make an informed decision for your team. Have you used an acoustic imager before? Share your thoughts in the comments below.
For facilities with significant energy costs for compressed air, gas, or cooling systems, the answer is typically yes. Based on our testing, the device can quickly identify leaks that cost thousands of dollars annually in wasted energy. The integrated cost analysis turns a technical tool into a financial asset for your maintenance program.
Contact probes require you to be very close to the leak source and only convert sound to audible frequency. The ii915 can identify leaks from a distance of 10 meters or more, adding visual overlays to pinpoint the exact location instantly. This makes it significantly faster and safer for scanning large areas from a distance.
Basic leak detection is very simple. You can start finding leaks within minutes of unboxing the device. However, mastering the advanced modes like PDQ and MecQ and interpreting the data takes a few days of hands-on practice. The user interface is designed to be intuitive for new technicians.
The box includes the main unit, a battery, a charger, a cable, a case, and straps. For heavy daily use, we recommend purchasing a spare battery pack and a set of high-quality noise-canceling headphones for better audio analysis. You can find these optional accessories for an enhanced experience.
Fluke provides a standard 2-year warranty for the ii915. Their customer service is well-regarded in the industry, offering phone, email, and chat support. Extended warranty options are available for purchase for added peace of mind.
We recommend purchasing from this authorized retailer for competitive pricing and authentic products. Prices can fluctuate, but buying from an authorized source ensures you receive the full warranty and support that a grey market purchase would not offer.
Yes, the high-frequency sound of a pressurized gas leaking through an insulated pipe or fitting can often penetrate the insulation material. The ii915 is very effective at finding these hidden leaks, which are very difficult to locate with traditional methods without removing the insulation first.
We found the battery life to be sufficient for a full working day of intermittent use (approximately 6 to 8 hours of active scanning). The smart battery provides a clear percentage indicator so you can plan your day. Continuous heavy use with the screen at full brightness will drain it faster.
Stay Updated with Our Latest Reviews & Guides!
Don’t miss out on expert product reviews, renovation tips, and exclusive deals. Join our community of smart shoppers and DIY enthusiasts!
Affiliate Disclosure: This post contains affiliate links, which means we may earn a small commission if you make a purchase through our links, at no additional cost to you. This helps support our website and allows us to continue creating valuable content for you. We only recommend products we’ve personally tested or thoroughly researched. Thank you for your support!